Have you considered using Minecraft in the classroom? Well…..you should!!!! You don’t need to be a Minecraft master or have even played Minecraft. I had never played it before using it with my students. I literally learned right along with them. Minecraft Education Edition is one of my favorite tools to use in the classroom. It is a great tool to use to teach the 21st Century Skills that EVERY student needs in order to be successful in life. Skills such as collaboration, collaboration, teamwork, critical thinking, and problem-solving.
Minecraft Motivates:
If you ask your students there are probably very few that have never played Minecraft. In my experience, some teachers are hesitant to use Minecraft with students because they know little about it and how it could be used. On the other hand, students know quite a bit about the interworkings of Minecraft, which intimidates some educators. As educators, we need to use what we know MOTIVATES students. We must not shy away from new tools just because students may know more about them. Times are a-changing in the education world and students are increasingly getting more difficult to motivate. Trust me, anytime you can speak their language and use the tools that they are already using in an educational way, you build mega motivation!!!!
Minecraft Education Edition Teacher Features:
Minecraft Education Edition has some AMAZING teacher features. The Education Edition offers tutorials, classroom management tools, lesson plans, special blocks, non-player characters, a camera, student portfolios, and writable books. Teachers can freeze students in their tracks, teleport their character to a specific student, teleport all students to the teacher character. The teacher in the middle school example below created a virtual timeout that he would teleport students to when they would misbehave within the game.
Minecraft In The Classroom PBL:
Check out how one middle school science teacher used Minecraft in his classroom with some 7th and 8th-grade students. Mr. Reagan realized how motivating Minecraft was with his own children and thought of an AWESOME way to use it in his classroom. He created an entire project-based learning unit complete with standards and lesson plans based on using Minecraft as the main tool. Mr. Reagan had his students create a real-life digital replica of our middle school using their 21st Century Skills complete with introductions from middle school teachers.
Our district has an early childhood center, an elementary school, a middle school, and a high school, all in different locations around town. Most students aren’t super familiar with the staff or layout of the different buildings. Mr. Reagan’s class of 7th and 8th graders used real blueprints to create a tour of the middle school for those students who will be new to the building and new middle schoolers to the district. His students created non-player characters of many of the teachers (all that were willing to participate) along with a YouTube video of that teacher in their classroom. He then had his students present their middle school Minecraft world to the 5th-grade students who will be entering the building come fall. For more PBL ideas click here.
Other Ideas For Using Minecraft In The Classroom:
In addition to the lesson plans that are offered within the Minecraft Education platform, there are so many other ideas and ways that Minecraft can be used in the classroom. You really just need to think outside of the box. Here are a few ideas that have been brewing in my head that I thought I would share:) Please keep in mind that these can all be created as a group, partners, or individually. I prefer partners or groups to give the students the practice of working well with others, collaborating, and communicating.
Create a scene from a book: This is a great alternative to a traditional book report! My 3rd-grade students read Jack In The Beanstalk and created the setting which included Jack’s house, the beanstalk, and the ogre’s castle. The students found out through a little problem solving that they could actually build the ogre’s castle in the clouds. It turned out AMAZING!!!! I also used Minecraft as an option for a book report and had a few students choose it to present their reports, complete with a timeline, actual structures that had a significant meaning to the timeframe of that person’s life. Two of my students read about King Tut. They collectively created an Egyptian pyramid complete with signs of important events throughout his life. They also included non-player characters of important people in King Tut’s life. Students can then either screencast a tour of their world to show to the class, or invite the students to join their “world” and do a self-guided tour with their Minecraft character.
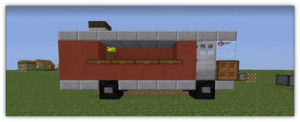
Create a prototype for a real-life project. I am working on a project of getting a real-life food truck set up for our high school students with special needs. We needed a tool that the students could use to create a prototype of our food truck including the inside and outside design and necessary elements. Minecraft was perfect! The students measured the real truck (that is currently in the bare-bones phase) finding both the area and perimeter of the inside and outside of the truck. The students then worked together to create the truck. Their digital prototype will be presented to the administration.
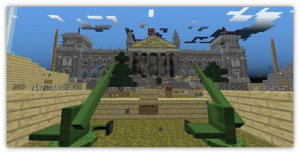
Create a model of a landmark or historical event. The possibilities are endless here. Create the Alamo, the Great Wall Of China, Bronze Age Cities, World War II internment camp replicas…..
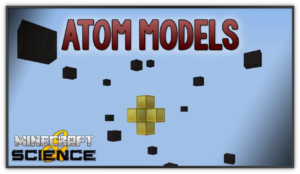
Create a 3-D model of a human heart, a cell, an atom, an animal…….
Create Math Problem models…
My Advice:
Minecraft can be used in the classroom in many ways. There are many benefits of using this tool with students, the motivation being number one in my book. Students are engaged in learning without really even knowing it!!!
Don’t be afraid of using a tool that students might know more about. I mean…… think about how empowered students will be from turning the tables and teaching you a thing or two about Minecraft. Just be informed. Minecraft Educational Edition offers tutorial worlds and training videos for teachers. I highly suggest going through this before getting your class started creating. Check it out here.
Along with developing the “soft skills” or the 21st Century skills, students need to be directly taught these skills. Having them practice the new skills in Minecraft is perfect, but additional directly taught lessons need to be administered. Start small, use it to replace something you already do. Give students choice in the tools they can use to present information, Minecraft being one of them.
Click here for more information on Minecraft Education Edition
Check out one of the following books to help you get started.
How are you using Minecraft in your classroom? I would LOVE to hear your ideas:)
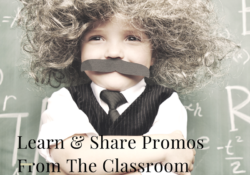
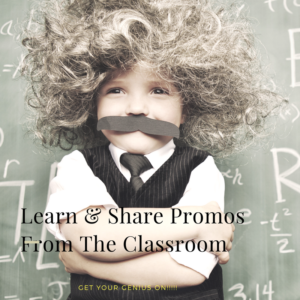
Have you ever wondered what the other teachers are up to in their classrooms? Have you wanted to visit another teacher’s classroom but couldn’t work it out in your schedule or theirs? Are you working with “secret geniuses?” Learn & share promos are the way to go!
There are ssssssoooooo many times as a teacher that I would walk into one of my colleague’s rooms at the end of the day to find something AMAZING that they did with their class. I would think to myself, “why didn’t I think of that and how come they didn’t share this awesomeness with me?” Now that I am an instructional coach I get to see the AWESOME things that teachers do on a daily basis firsthand. The other instructional coach and I came up with the idea to give other teachers a glimpse into their colleague’s classrooms and share their “secret genius” ideas by creating learn and share promos. Check out all of the awesome things our teachers have been up to!
Gone are the days of keeping to ourselves! Our goal is to create our very own teaching channel created solely of learn and share promos from our teachers aka “secret geniuses”! We really want to change the culture of our school to a culture of collaboration and sharing and learn & share promos are just one strategy we are using. Check out our completed promos here!
What Is A Learn & Share Promo?
Learn & share promos are designed as commercials, short (15 minutes or less) infomercials about topics teachers are willing to share. Something that they choose, that they have worked hard on and are proud to share. A new idea that was learned through a class/conference/webinar or through research. A practice they feel other teachers would benefit from or something they wish they would have had before starting something new or making a change. As teachers, our passion is to teach. We need to expand our mindsets to not only teaching our students but teaching each other.
High School Math- Growth Mindset Learn & Share Promo
After studying the behavior of thousands of children, Dr. Dweck coined the terms fixed mindset and growth mindset to describe the underlying beliefs people have about learning and intelligence. When students believe they can get smarter, they understand that effort makes them stronger. Therefore they put in extra time and effort, and that leads to higher achievement.
How Is A Learn & Share Promo Created?
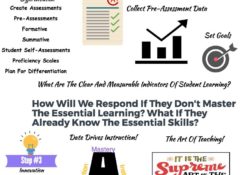
Each learn & share promo video that we created follows the 4 questions of a PLC conducted through a student-centered coaching cycle with an instructional coach. We used the Learning By Doing book (below) as our guide. Starting with the foundation of who are our students as learners? Question #1: What do we want our students to know (standards)? Question #2 How will we know if our students have mastered the content (assessment)? Question #3 How will we respond when a student experiences difficulties (differentiation)? Question #4 How will we respond to the students who already know the content (differentiation).
https://www.youtube.com/watch?v=el2AMv4N9pQ
Math Centers In 1st & 2nd Grade Classrooms- Learn & Share
The goal of reorganizing a classroom into math centers is to allow the teacher to provide the highest quality instruction to a small group of students, while other students work productively, independently, and cooperatively in a variety of interconnected tasks at other activity centers. At scheduled times, students shift to a different center so that eventually all students have the opportunity to complete the tasks at every center, as well as to work with the teacher in a small group! I would suggest 15-minute rotations.
Why Create Learn & Share Promos?
As teachers we are often times, at no fault to ourselves, are confined to our classrooms. It’s how schools have been run for years. We get busy with the day to day hustle and bustle and have everything scheduled down to the minute. We don’t give ourselves credit for the creative things we do. We feel that if we share our ideas we will be seen as boastful, a know it all or a bragger. Well……….. it’s time to make a change.
The culture of teaching is changing. Teachers roles are changing. We are now not just lecturers. We don’t just read from basals as students read from their books. We don’t shut our doors and “hide” in our classrooms. We are facilitators and collaborators with open doors, open minds and are creating a culture within the classroom of learning from each other. As teachers, we are also joining a culture of learning more from each other. Practice what you preach right…..
Responsive Classroom is a research-based approach to K-8 teaching that focuses on the strong link between academic success and social-emotional skills.
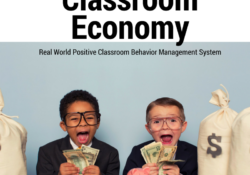
A classroom economy is a classroom behavior management system designed to mimic a real-world economic system. It’s time we invest in our students and bank on good behavior, rather waiting for bad behavior to occur. While economics is considered part of math and social studies curriculum, textbooks and other programs often neglect to incorporate economic instruction.
The classroom economy can fill this void while serving as a fun way for students to act as both consumers and economists in a real world setting. The classroom economy is used as a form of positive behavior management, but it’s real purpose is to help students learn necessary principles of economics throughout the entire school year. Positive behavioral interventions and support (PBIS) is defined as a framework for enhancing the adoption and implementation of a continuum of evidence-based interventions to achieve academically and behaviorally important outcomes for all students (Sugai et al., 2000).
How It Works:
Every month students earn paychecks and bonus money for completing a classroom job and bonus activities such as turning in homework. They also pay fines, electricity bills, and rent for their desks, and they have the opportunity to purchase prizes at auctions (or a school store)—all with classroom economy currency (mock money). They will have the opportunity to save their money and purchase their desks forgoing paying the monthly rent.
Students will be in charge of setting a short and long term goal and keep track of their own finances. They have the option of keeping “classroom cash” or depositing their money into the classroom bank where they will earn a monthly dividend for keeping their money. Much like the “real world”, lost cash is lost cash. Students will not receive more cash to replace their lost cash. They are responsible for keeping their own money in a safe place. Students are also responsible for keeping track of their balance to ensure they have earned enough money by the end of the month to pay their bills.
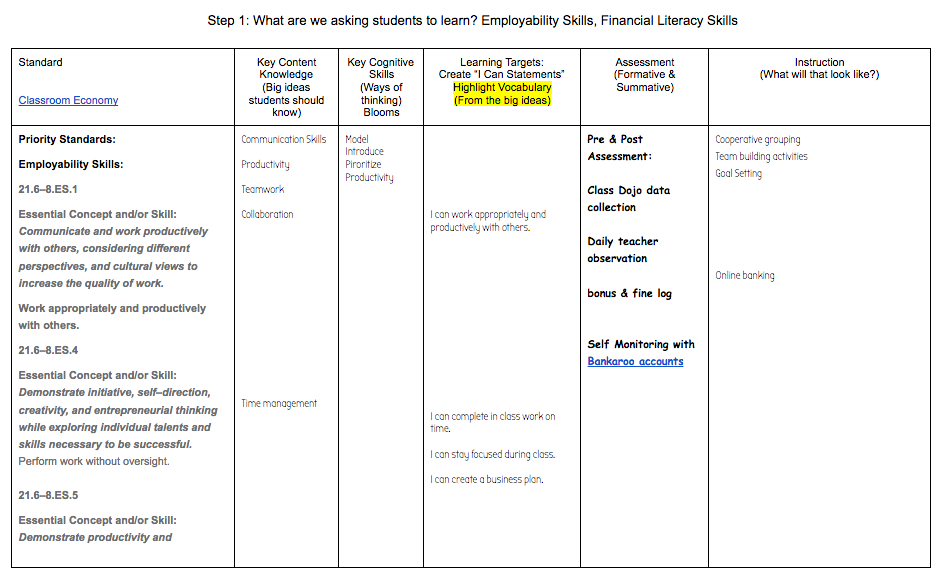
Standards:
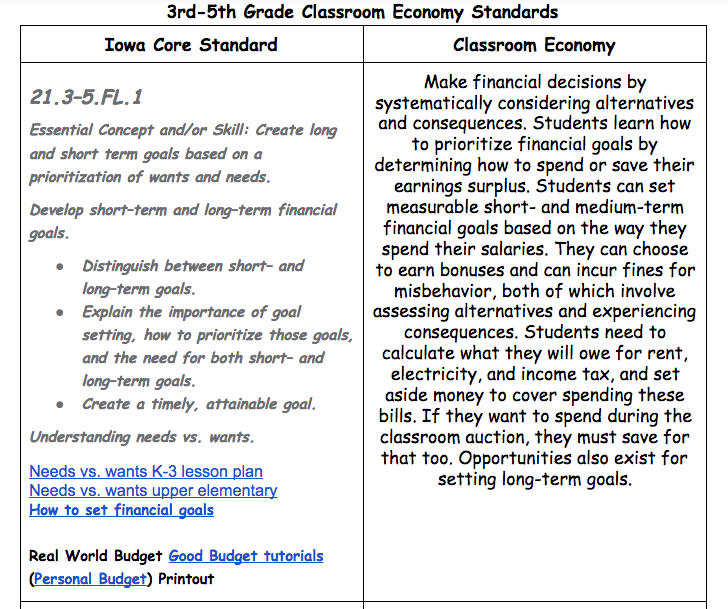
Everything we do in our classrooms should be purposeful. I believe that everything we teach in our classrooms should focus on meeting our state standards. I focus the 21st Century Skills (financial literacy) for my state. Here is an example of the 3rd-5th-grade and 6th-8th-grade financial literacy skills in the state of Iowa (my home state) that connect with the classroom economy. This is on a Google Doc that includes standards for both elementary and middle school. If you would like an editable copy to use to adapt to your needs click on the link below.
To get started on your classroom economy, check out this video by Thom Gibson, he’s a classroom economy GENIUS!!!!! Check Thom Gibson out here.
The classroom economy program is an effective and enjoyable way to teach your students fundamental financial literacy components without altering your curriculum.
Implementing the program is an easy three-step process:
Before the school year starts, you spend a few hours gathering materials and planning how to customize the program for your school and your own classroom (or ask your instructional coach for a classroom economy coaching cycle:).
During the first month of school, you spend some classroom time introducing the program and training the students to complete their tasks (procedures). I like to have my students help come up with the list of bonuses and fines.
Throughout the year, you monitor the students’ progress and provide support and guidance when necessary.
As they perform their tasks, the students will help you manage the classroom and, in the process, learn valuable skills—such as responsibility, the value of saving, and delayed gratification—that they will carry with them throughout life.
The beauty of the program is that you don’t need to teach too many lessons; rather, your students will experience them and learn for themselves. I have found it beneficial to directly teach a needs vs. wants lesson right before the classroom auction/class store. There’s a thrill in seeing “the light bulb go on” when a student realizes he or she should have saved money for the next month’s rent instead of overpaying for an item at the auction. It’s also amazing to witness the students experience “buyer’s remorse” at the auction.
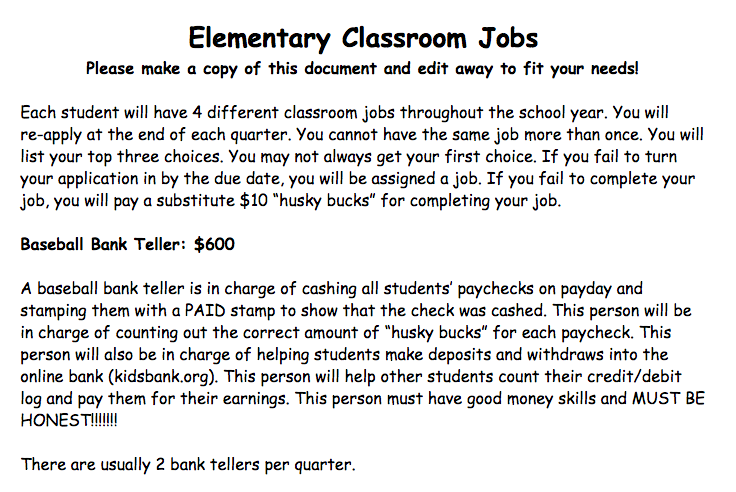
Classroom Jobs:
Every student will apply for a classroom job (a different job per quarter). Or, students could keep the same job all year if you choose. Make it your own and set it to what works best for your classroom needs. The students will list their top 3 choices. It is not unusual for many students to want the same job. Your application is your chance to persuade me why you are the best person for the job that you want. If you do not get your first choice job don’t worry, you have a total of 1 more application throughout the school year. If you fail to turn in your job application by the due date, a job will be assigned to you.
Every job is different; therefore, the paycheck prices are also different. Students will be paid (“classroom cash”) at the end of each month for completing their job. Jobs range from $500-$850 per month. You will keep the same job for 9 weeks at a time (each quarter). Students can be fired for not completing their job. If you would like an editable copy of the classroom jobs, click on the link below. This is on a Google Document. You will just need to make a copy of the document to make it your own. This document includes job examples for elementary students (I used with my own 3rd graders) and middle school job examples (I used in an 8th-grade math coaching cycle).
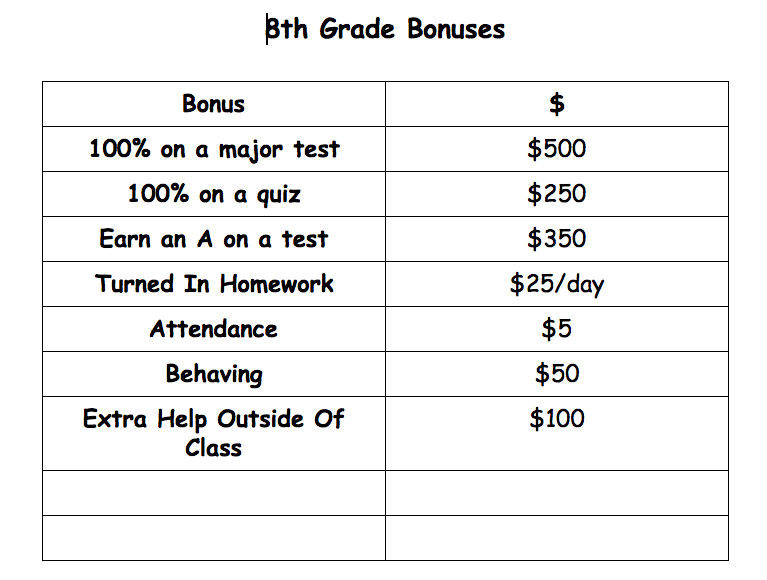
In addition to the salaries that you earn from your jobs, you can earn bonus money by performing well academically and participating in extra activities. You will need to earn bonuses to make rent and save up for the auction as your paychecks are not enough to pay rent. In addition, bonuses can be useful incentives for your own class goals.
Fines
In the classroom economy, the role of fines is to help you understand costs and consequences—it is not to punish you. Click on the link below for your free editable copy of the classroom bonus/fine Google Document. To adapt this to your needs please make a copy of the original document and edit away! I created these with the students, which is very important for student buy-in and ownership.
Introducing The Classroom Economy To Your Students:
I print a copy of the student/parent info packet out for each middle school student and share the parent packet at elementary open house. Make sure you start with a broad overview. Don’t share all of the information at once, it could be very overwhelming to students. For younger students, I usually just explain what it is on the first day, then pick one section to go over one day at a time until everything has been communicated.
Older students can usually handle more information at once, so I usually share more with them the first day. I usually don’t explain payday or the auction until right before we do them. There will be TONS of questions and LOADS of excitement. After explaining the system to your students and having them help come up with the bonus/fine list.
Hiring Students For Classroom Jobs:
Use your best judgment. I always start with the jobs that only one student has applied for. It is important to keep track of which jobs each student has applied for so that if they don’t get their first choice, they will have future opportunities to get them (if your students will be changing jobs throughout the year). I use a job application which requires students to list their top 3 choices and requires them to sell themselves on why they are the best student for the job. This is designed to mimic a real-world job application. I also hold interviews if there are multiple students applying for the same job. Use the link below to grab your own editable copy of the job application. Please just make a copy in order to make it your own. I have this on a Google Doc that I share with the older students. I print a copy and have younger students fill out by hand.
I have used both Kidsbank and Bankaroo. I prefer Bankaroo because it has an app option where students can access their bank account information using a cell phone or iPad as well as online using a computer. Both options allow teachers to choose one or two students (the bankers) to have full access to add funds, while all other students can just view their funds. There are positives and negatives with both options. Check out this video that explains the positives and negatives from Thom Gibson.
Putting Your Student On A Budget:
I used the envelope budgeting system to put my students on a budget. They were responsible for creating their own goals and creating their own digital envelopes within their Bankaroo accounts. This is another reason why I prefer Bankaroo over Kidsbank. Check out this video on envelope budgeting by Jordan Page from funcheaporfree.com. This girl is seriously entertaining and super informative.
Classroom Auctions:
Classroom auctions are held at the end of each month, after payday has occurred. I have student auctioneers with the older students and I am the auctioneer with younger students. Once all of the students have been paid for their jobs and bonuses and fines and rent have been deducted and money has been budgeted, it’s time for the fun to begin. My students don’t use auction paddles or have numbers, I just have them raise their hands to bid. My student auctioneer runs my auction. This student sets the starting bid for each item. The auctioneer works with the bankers and the secretary during the auction. The secretary keeps track of everything purchased at the auction and the bankers collect the payments.
This is not exactly how my classroom auction goes, but I thought it is a pretty fun example of what it could look like. I think I might try this in my classroom.
I collect items from local businesses such as free 6″ sub coupons from Subway, donated items and have gone on some corporate gas station websites and have been lucky enough to get some gift cards. In addition, I have created teacher freebies that I auction off. You can find a link to my free auction tags below. I also have items that students are interested in. This year I have added squishies, slime, scrunchies, laptop stickers, slap bracelets. All items are pretty cheap on Amazon for a pretty large quantity. Other hot itmes include school spirit items like water bottles, balls, bags, hats and t-shirts with our school logo.
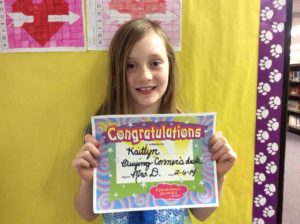
Students learn that if they save their money and purchase their desks, they won’t need to pay rent again and will get to keep most of their paychecks. They will still need to pay the bills (electricity, taxes…), but in the long run, will make better financial decisions and will get to keep most of their hard earned money. I also give my students the opprotunity to save their money and purchase another desk. They then become the landlord and the student’s desk they purchased pays their rent to the new owner. The point of this is to minic the real world as much as possible. Students whose desks have been bought by another student still have the opprotunity to purchase their desk from their new landloard as soon as they are able to. Students earn a certificate when they purchase their desks to show ownership. This is a proud moment for students.
This is a great teaching opprotunity to discuss Monopoly. With my 3rd graders we had a Monopoly board game tournament. I like to use the Ultimate Banking Monopoly.
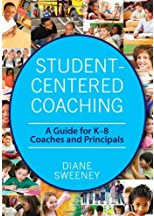
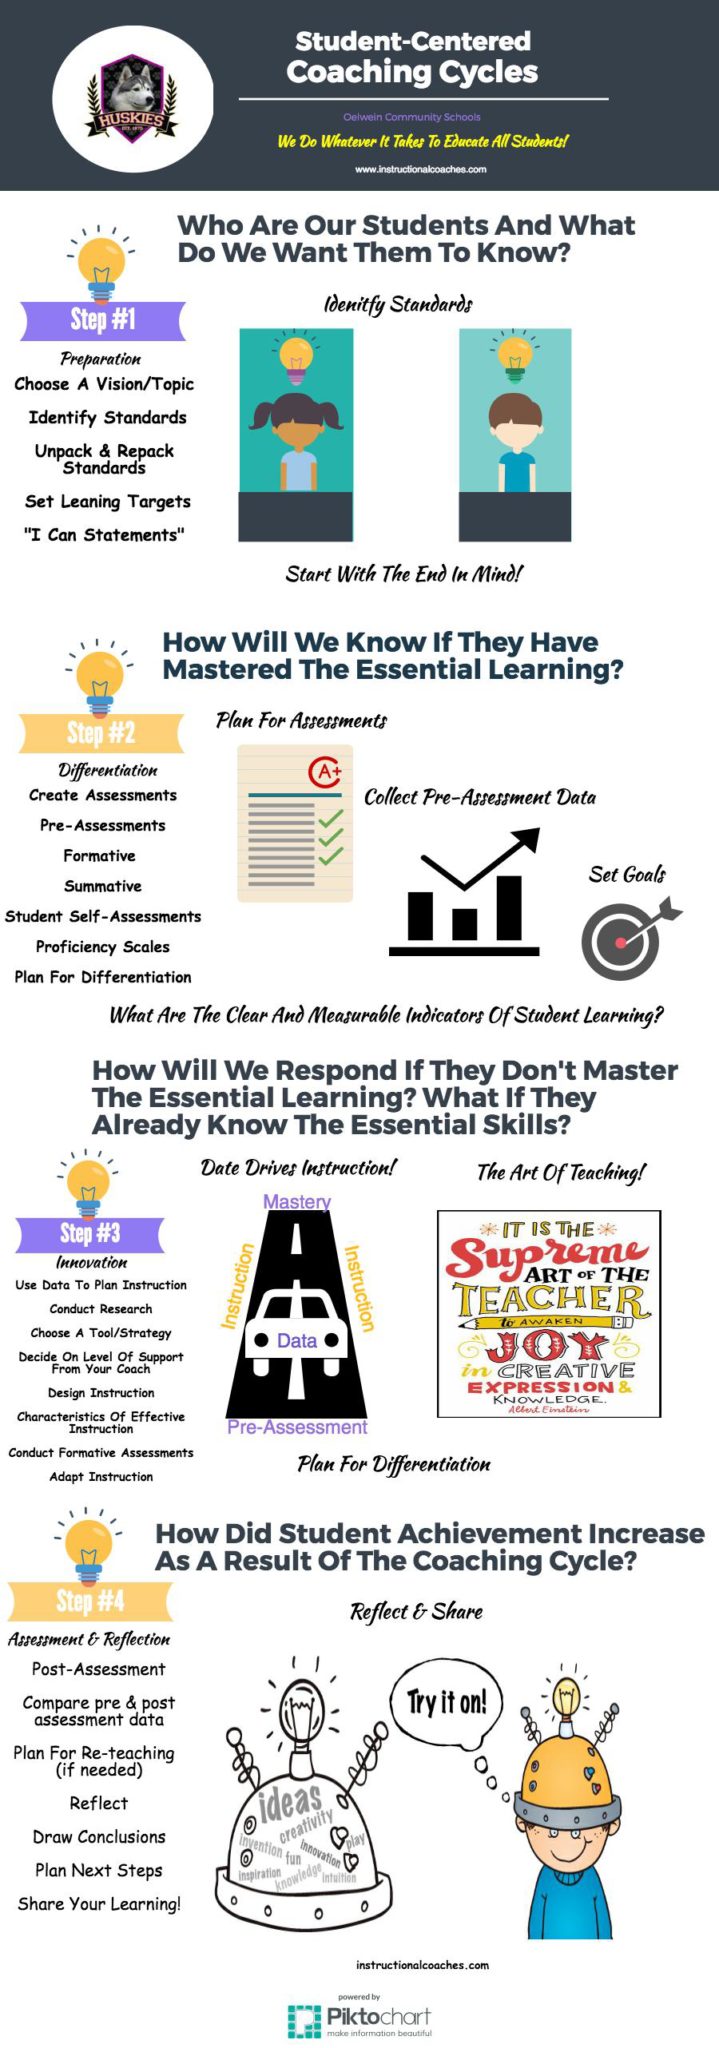
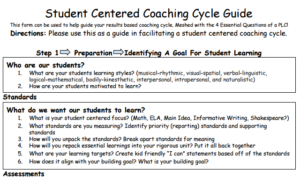
Are you new to instructional coaching? Have you started conducting coaching cycles? Try implementing student-centered coaching cycles using a student-centered coaching cycle guide. Student-centered coaching cycles are based off of the book called, Student-Centered Coaching by Diane Sweeney. Student-Centered Coaching introduces a new way of looking at and delivering school-based coaching across grades K-12 that puts the needs of students’ front-and-center. By focusing coaching on specific goals for student learning and student data, rather than on changing or fixing teachers, a coach can navigate directly towards a measurable impact and increased student achievement.
Components of Coaching Cycles:
4-6 weeks long
1-3 times per week in the classroom during instructional time
Student-centered coaching is a great framework to use to take the pressure off of both the teachers and the coaches. Student-centered coaching focuses on using student data to drive instructional decisions. Pedagogical changes are made according to student needs. Student data is used to focus on differentiation techniques and the art of teaching. As we know, EVERY student has special needs. No two students are exactly alike. They learn at different rates and have different abilities. It’s time we adapt our teaching to fit the needs of every individual student, not just the students with “special needs”, to throw out the one size fits all framework to teaching and focus on doing whatever it takes to educate all students (our school district’s mission statement).
It’s time to gently push your teachers outside of their comfort zones for the benefit of student learning. Our job as an instructional coach is to get teachers to think outside of the box. (P.S. Don’t be surprised if you only get a toe outside of the box, consider it a success)!
Check out my other coaching cycles and learning labs here!
Goals Of Student-Centered Coaching:
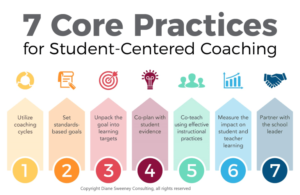
7 Core Practices For Student Centered Coaching
1. Setting goals for coaching cycles:
Goals should be student-centered, standard focused, set by the teacher and focused on student pre-assessment data. Data should drive your instructional decisions.
2. Using standards-based learning targets:
A Learning Target is… A goal for students derived from standards, written in concrete, student-friendly language, tracked by students and teachers to assess growth and achievement, about learning, not a task and easily measurable.
3. Using student evidence to co-plan instruction:
Anything that makes student learning visible, performance assessments such as; reading and writing tasks, discussions with students, conferring notes and student work samples. Student Evidence usually doesn’t include… summative assessments from the back of the book, bubble in assessments, tasks that don’t involve reading, writing, or solving problems, tests!
4. Organizing coaching through cycles:
Qualities of Coaching Cycles: Ongoing, aligned with standards and curriculum, focused on a goal that is set by the teacher, incorporates best instructional practices, incorporates co-planning and co-teaching.
5. Co-teaching with a focus on effective instructional practices:
There are 6 models of co-teaching including: one teach/one observe, one teach/one assist, parallel teaching, station teaching, alternative teaching and my favorite…… co-teaching! Make sure that the classroom teacher directs the coaching cycle. Make sure that you are co-planning and co-decision making. Remember, it is their classroom and you are a teacher, not an administrator. Also, in order for the teacher to successfully adopt the learning from the coaching cycle they will need to “buy in” to the process and feel that their voice is strong throughout the process. If they feel that the coaching cycle was truly a joint learning experience, they are more likely to continue using the strategy.
I really like using the gradual release model so that teachers feel supported. We create a coaching cycle together, but the teacher continues with the strategy. I check in from time to time (more at the beginning of the release) to see how things are going to see if they want any more support. That way they don’t feel that it is just a dump and run (dump a strategy on them and leave with no support).
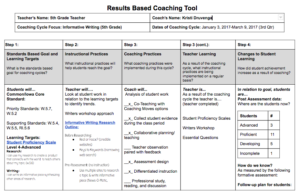
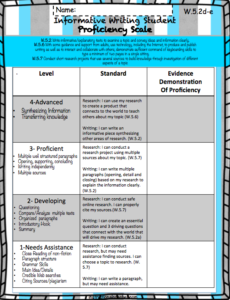
The results based coaching tool is a must use tool in conducting student-centered coaching cycles. It really helps keep things focused and lays out the process nicely. I really like the teacher and instructional coach reflection that has been recently added to this tool. I believe that reflection is a MUST when growing as a teacher/coach. My coaching partner and I took the results based coaching tool from the book Student-Centered Coaching and tweaked it to fit our student-centered coaching cycles. Below is an example of the student-centered coaching tool that I completed with a 5th-grade teacher on the topic of informative writing.
Click here for a better view of this completed tool
Student-Centred Coaching And PLC’s
The book Learning By Doing by Rick DeFours is AMAZING and has become my educational bible of sorts. It literally sets out a step by step guide that walks you through working with PLC’s with a focus on standards, assessments, instruction and alignment. I couldn’t do what I do without it!
Our student-centred coaching cycles are based on Rick DeFour’s 4 Essential PLC questions.
Who are our students and what do we want them to know? (Standards/learning targets)
How will we know if they have mastered the essential learning? (Formative/Summative Assessments)
How will we respond if they don’t master the essential skills? (Innovation & Differentiation)
How will we respond if they have already mastered the essential skills? (Differentiation)
What forms do you use in student-centred coaching cycles? Please leave a comment. I would LOVE to learn about other tools.
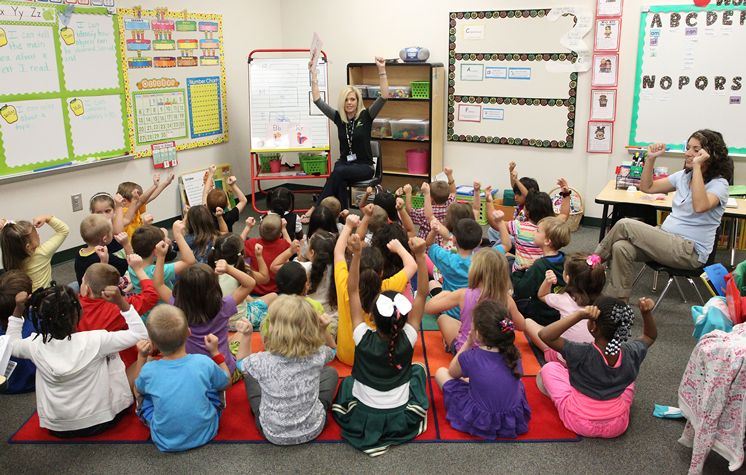
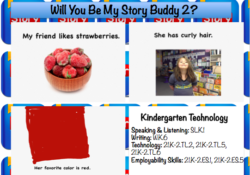
Learn how even the youngest of students (Kindergarteners) can hit multiple standards by creating digital stories with the Story Buddy 2 app. Check out this Story Buddy App tutorial to get started on creating your own Story Buddies!
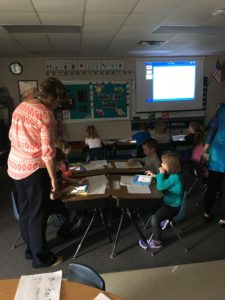
This past week, I have had the opportunity to help some Kindergarteners create digital stories about their friends. It is one of my FAVORITE jobs as an instructional coach! I LOVE to use technology with students to enhance learning. It’s AMAZING what even the youngest students are capable of. It was really exciting to see them in action using the technology tool Story Buddy 2. There are tons of digital story making apps out there, but I find the Story Buddy 2 app is the most user-friendly, even for the youngest of students! This project meets multiple standards including writing, technology, speaking and listening and employability skills (see below). Thank you for inviting me into your classroom for this project Mrs. Bratten:)
Step 1: Interview And Take Notes
Mrs. Bratten’s Kindergarteners interviewed a friend to find out their friend’s favorites including favorite color, food and activity. Mrs. Bratten gave her student’s the job of taking notes about their friend’s favorites using a graphic organizer. This was a great activity to practice their speaking and listening skills along with learning about another friend in their class.
Step 2: Write Sentences
The Kindergarteners then used their notes to write sentences based on their friend’s answer. Each sentence will be used on a page of their digital book. The students were focusing on starting each sentence with a capital letter, writing complete sentences using proper punctuation and finger spacing.
Step 3: Take Pictures/Find Images
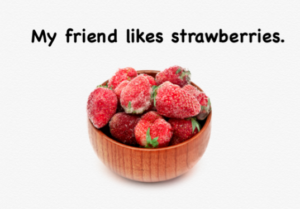
Our first task in starting to create our digital story was to get a good picture of their friend. This ALWAYS takes a LOT longer than I think it is going to, but we always manage to get it done right. The kindergarteners learned how to use the camera app on their iPads. We worked on keeping our fingers from getting in the way of the camera, holding the iPads steady, waiting for the focus option to stabilize before taking the picture and checking to make sure we had at least one quality (non-blurry) picture with our friend looking at us. Our next step was to find a picture on the internet that represented the food the students will use in their digital story. We used Google images to find these pictures. This lead to a great opportunity to teach some digital safety skills. Once the student found the picture that they wanted they learned how to save the image to their iPad.
Step 4: Create Digital Stories
Now it was time to put all of the hard work together to create a digital story. We used the Story Buddy 2 app on the iPads. Students first created a new story and saved it with their names.
Name, Save & Edit: My first goals were to have each student name their creations so that they would it was theirs when we went back in to work on them. I also wanted to show the students how to save properly and re-enter to edit their digital story.
Type 1st Sentence: The students then entered back into their story to put it all together. We had the students start out with typing their first sentence using the typing tool and the keyboard. Students learned how to capitalize letters (beginning of their sentence and names) using the shift key on their iPad keyboards. They also learned how to use the spacebar to create finger spaces between each word in their sentence (to match their handwritten sentences) and how to use the prediction tool built within the iPad to help with spelling.
Upload Pictures: Once their sentence was written for their first page, the students learned how to use the camera button to add the picture (from their iPad’s camera roll) they took of their friend. They also learned how to rotate, move and resize their picture. The pictures were centered directly under their sentences to mimic the pages of a real book. We created the first page together.
Create Multiple Pages: Once the first page was finished it was time to add multiple pages using the same process on their own. Each student created one page for each sentence they wrote. They each wrote 3 sentences and created 3 pages.
Last steps: The last step was to create a cover page for their books. We added another page for our title page. The students typed a title and entered a background color for their cover page. We created these together. Their next job was to add a background color to all of the pages that they created. They did this on their own. The students then were shown how to move their title page to the beginning of their story by dragging and dropping it into the correct order. Once these steps were completed, it was time to save. Once saved, I was able to save the completed projects to my Google Drive where I shared them with the teacher and sent them to the print shop to be printed in color. In addition, I posted them on our district Facebook page to share with the world. The teacher sent the completed stories home with parents at conferences and created a bound classroom book.
Kindergarten Standards Met:
Speaking and Listening Standards
SL.K.1: Participate in collaborative conversations with diverse partners about kindergarten topics and texts with peers and adults in small and larger groups.
Follow agreed–upon rules for discussions (e.g., listening to others and taking turns speaking about the topics and texts under discussion).
Continue a conversation through multiple exchanges.
Writing
W.K.6: With guidance and support from adults, explore a variety of digital tools to produce and publish writing, including in collaboration with peers.
Technology Literacy
21.K–2.TL.2 Essential Concept and/or Skill: Use a variety of technology tools and media–rich resources to work collaboratively with others.
In a collaborative group, use a variety of technologies to produce a digital presentation or product in a curriculum area.
Use technology resources for communicating and sharing ideas with others.
Participate in learning activities with or about learners from other countries and/or cultures.
21.K–2.TL.5 Essential Concept and/or Skill: Understand and practice appropriate and safe uses of technology.
21.K–2.TL.6 Essential Concept and/or Skill: Understand basic technology hardware and software and their application.
Employability Skills
21.K–2.ES.1 Essential Concept and/or Skill: Communicate and work appropriately with others to complete tasks. Work appropriately and productively with others.
21.K–2.ES.5 Essential Concept and/or Skill: Work productively and are accountable for their actions. Deliver quality job performance on time.
Recognize quality work.
Demonstrate a sense of timeliness.
Stay on task until work is completed.
Understand concept of ethical behavior in producing work.
Demonstrate accountability for individual performance.
A must-read for incorporating digital literacy into your classroom!
Equip your students with essential 21st-century media literacy skills, as they read, write, speak, and create art within the context of digital storytelling, and reach deeper understandings in all areas of the curriculum! In this second edition, both novice and technologically adept K-12 educators will find:
Practical techniques to combine storytelling with curriculum content
Tips for exploring effective storytelling principles through emerging digital media as well as via traditional literacy skills in reading, writing, speaking, and art
Visual aids and video clips that illustrate best practices in media composition
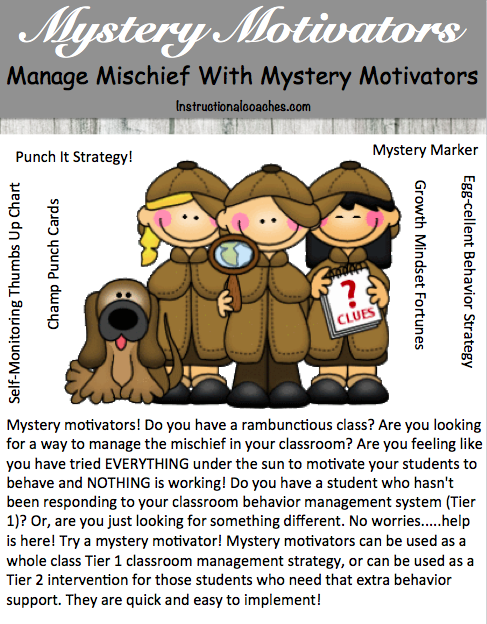
Do you have a rambunctious class? Are you looking for a way to manage the mischief in your classroom? Are you feeling like you have tried EVERYTHING under the sun to motivate your students to behave and NOTHING is working! Do you have a student who hasn’t been responding to your classroom behavior management system (Tier 1)? Or, are you just looking for something different. No worries…..help is here! Try a mystery motivator! Mystery motivators can be used as a whole class Tier 1 classroom management strategy or can be used as a Tier 2 intervention for those students who need that extra behavior support. They are quick and easy to implement!
As an instructional coach, I have been asked by multiple teachers to help with the little ones in their classrooms who just aren’t responding to their classroom management systems. As a former special education teacher, and my experiences working with students with behavior challenges along with working with my own child’s behavior challenges, I have conducted much research. A strategy that I have used in the past and kind of forgot about, is called a mystery motivator! It is an AMAZING strategy that I have had MUCH success with. Mystery motivators build an element of surprise and anticipation with students. This strategy goes along great with Positive Behavior And Supports (PBIS), which our school uses, Trauma-Informed Schools and The Leader In Me program. It is a strategy that focuses on POSITIVE behavior!
What Is A Mystery Motivator?
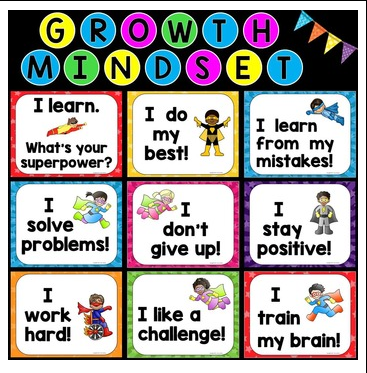
Students earn MYSTERY prizes or rewards. They literally have NO IDEA what they are working towards until they actually earn it! Rewards are hidden in items such as plastic Easter eggs, pill cases, envelopes, covered cups…. Items are placed into the mystery object. Items can be tangible items, activities, games…. Tangible items like stickers, erasers, gum, tokens, toys….anything you can fit into your motivation container will work. Or, they could be free items like 10 minutes of free time, game time with a friend, lunch in the classroom or high five from the teacher. The smaller items work really well with individual students. If you are using this whole class your rewards can be bigger like an extra recess, class game or treasure hunt. I also throw in some growth mindset quotes and Laffy Taffy type jokes that I like to call “fortunes” (modeled after the fortune cookie of course)!
Shouldn’t We EXPECT Student To Comply With Our Rules Without Rewarding Them?
I know!!! I know!!!! Students SHOULD just do what they are told. They NEED to comply!!!! They shouldn’t have to earn things just to get their work done, do what is EXPECTED!!! Well……. do you work for free? I mean really…. think about it…..would you come into work EVERY SINGLE DAY for free (that means absolutely NO PAYCHECK)!!!! I think most of you out there would answer no! I’m right there with you. I LOVE my job, the teachers and students I work with and am passionate about molding young minds, but I would not, could not work for no $$$$$. I have used mystery motivators with quite a few of our “high fliers”. They work every time!!!! Mystery motivators are a great Tier 2 strategy!
How Do I Start With A Mystery Motivator?
Individual Student or Whole Class? The key to using a mystery motivator is to first figure out HOW you want to use it and WHO you are using it with. Are you going to use it whole class or with an individual student or both?
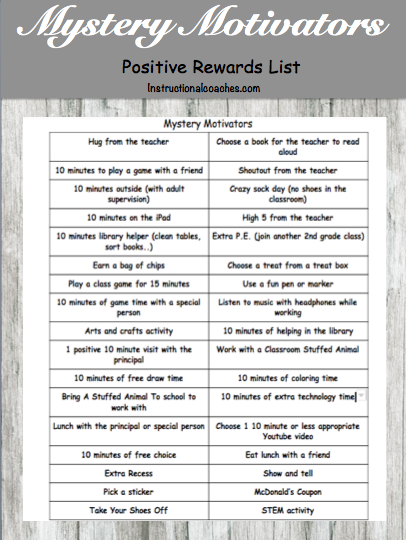
Survey Your Students: You will need to survey your students or have them come up with rewards they would like to earn. This is an important step. You want to make sure that students are earning preferred items and activities, otherwise, the motivation part won’t work.
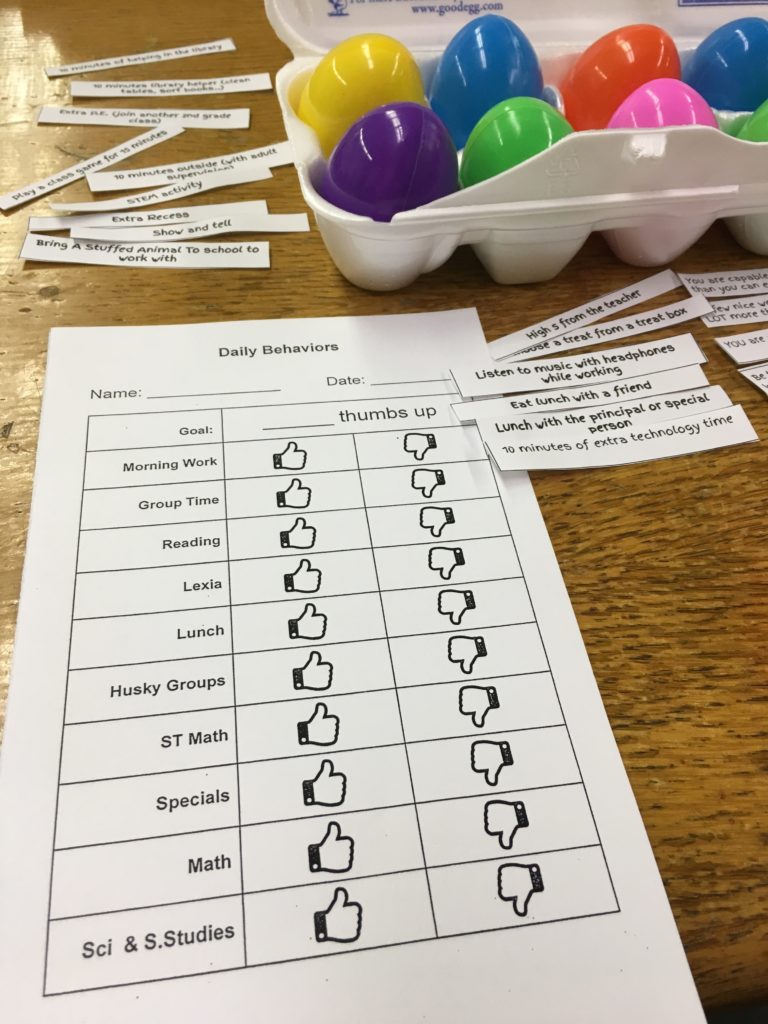
Brainstorm Motivators: I usually ask my whole class WHAT they would like to work towards earning. For individual students, I give them a list of items (usually smaller items) they can choose from and ask them if there is anything they would like to work towards that is not on my list. Check out my rewards list. If you are planning on using mystery motivators with your whole class and an individual student, make sure you create a list with the whole class and a specific list with the individual student. I cut this list up and use the slips of paper in my Easter eggs along with a growth mindset “fortune”. Click Here
Set PositiveBehaviors:
Students need to know how they will earn the mystery reward. What are you going to be looking for? Be specific with your positive behavior expectations! This could and SHOULD follow your classroom rules and behavior expectations. Make sure to keep it POSITIVE. Create a visual list and post it clearly in your classroom. Remember, this is a motivation tool, NOT a punishment tool!
Set Up Your Tools: Get A Full List Of My Tools Here!
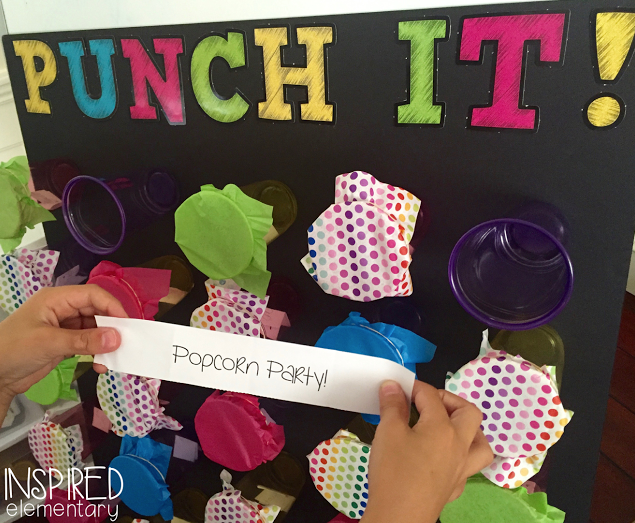
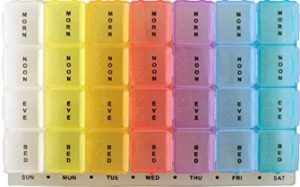
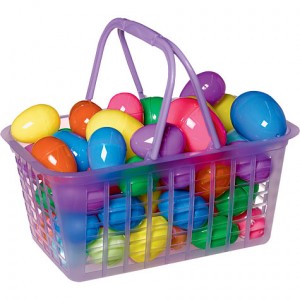
I have used a few different tools for my mystery motivators. I have used notecards or popsicle sticks in a manilla envelope (color the mystery square-great for all ages), plastic easter eggs (Egg-cellent behavior), covered cups (punch it picture-great for older students) and pill cases (yes the kind you keep medicine in)! Be creative! You can really use anything that you can HIDE the rewards in. My ABSOLUTELY favorite tool for (younger students) that I have used is plastic Easter eggs. They are fun to open, cheap and you can’t see through them. I keep them in an egg carton when I use them with individual students and a basket when using them whole class. These are very affordable and reusable! I like the Punch It Cup Board for older students (they like it too)! Check out inspiredelemenatry.com for ideas and directions on how to make this tool.
Set Your Timeline and Goals:
Will your students earn a class reward once a week, once a month, daily? It really depends on the behavior needs of your class and the age of your students. Younger students will need to earn a reward on a more short-term basis than older students could. If you have a really wild class, you will need a more short-term reward (even for older students). Like any management system, you will need to overdo it a bit in the beginning by setting shorter goals then build up to a long term goal. Students with more severe behaviors will probably need very short term goals. It’s immensely important to have students help set the goals! Goal setting is a great way for students to hold themselves accountable!
Whole-Class Mystery Motivators (Tier 1)
Mystery motivators really work well with a whole class. Grow a growth mindset with your mystery motivator!
Egg-cellent Behavior:
Place a growth mindset saying inside each egg (or another mystery item). For every egg earned, students will open and read the saying (all except for the “special egg” holding the mystery prize). Take a few minutes as a class to discuss what the growth mindset saying means. The goal is to fill the basket. This will help those students who just can’t help themselves or the ones who just want to sabotage or curious students. Remember, the goal is to keep the reward a mystery until the goal is met. Mystery motivators can be used as THE classroom behavior management system, or to enhance your current system. This could work with most systems. Here are a few I have used mystery motivators with to enhance what I already had in place.
Easter eggs filled with Growth Mindset messages or “fortunes” are PERFECT to use in your morning meeting or social skills training. I have placed role-playing scenarios or a what would you do type social skills situation in the eggs for our morning meeting. These lead to great conversations where students can make connections, reflect on a time that happened to them or someone they know and helps prepare them if that situation would arise in their lives. I usually choose topics that I saw we needed to discuss. In my 3rd grade class, we covered topics like telling vs. tattling, bullying, sharing, disagreements…..What a GREAT way to start the day!
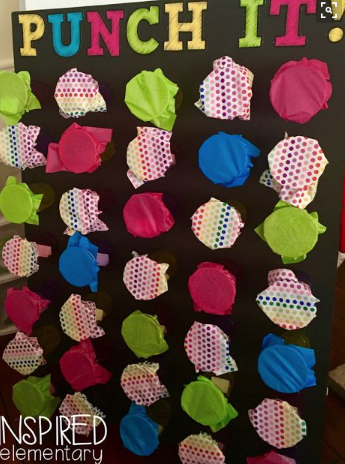
Punch IT!
How it works: Students earn letters (1 at a time) on the board every time the class is “caught” following classroom rules & procedures. Compliment them and write the letter “P” on the board. The next time you “catch” your class with positive behavior, write the letter “U” on the board.. Once the phrase PUNCH IT! with the exclamation mark is written on the board a student gets to “punch the cup”. Use a random student picking tool to determine the student. Inside the cups are class prizes and growth mindset quotes along with a reward of some type. Check out inspiredelemenatry.com for ideas and directions on how to make this tool. This blog is AMAZING!!!! Erin really does a great job explaining how to use this strategy along with tons of other cool posts:) I adapted this idea to fit my own classroom.
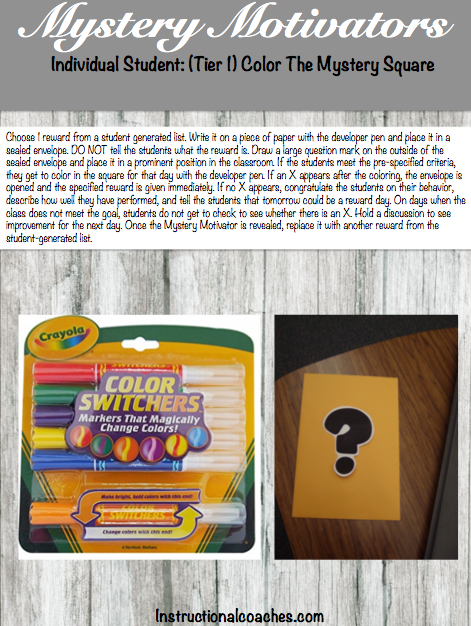
Mystery Marker:
If the students meet the pre-specified criteria, they get to color in the square for that day with the developer pen. If an X appears after the coloring, the envelope is opened and the specified reward is given immediately. If no X appears, congratulate the students on their behavior, describe how well they have performed, and tell the students that tomorrow could be a reward day. On days when the class does not meet the goal, students do not get to check to see whether there is an X. Hold a discussion to see improvement for the next day and set goals. Once the Mystery Motivator is revealed, replace it with another reward from the student-generated list.
This strategy is designed for those students who require a more instantaneous gratification. This works really well with students who benefit from a reward for each task they complete appropriately. To use the pill case as the mystery motivator (yes, it’s a real pill case) place a small reward in each box (NO PILLS PLEASE). I usually use items like small erasers, candies, crackers….. whatever will motivate your student. I also place a growth mindset fortune in each box that the student will need to read (or have read to them) and discuss with an adult.
You can also use the mystery motivators from the interest inventory along with a tangible reward, or by itself. It really depends on the level of motivation your student needs. Your timeframe could also change according to your student’s needs. They could earn their reward after completing one assignment, or after the entire reading block. You will need to decide what is best for your student and try different time frames. You will want to overdo it at first and give rewards often, then once it starts working, expand your time frame for those students exhibiting the more extreme behaviors.
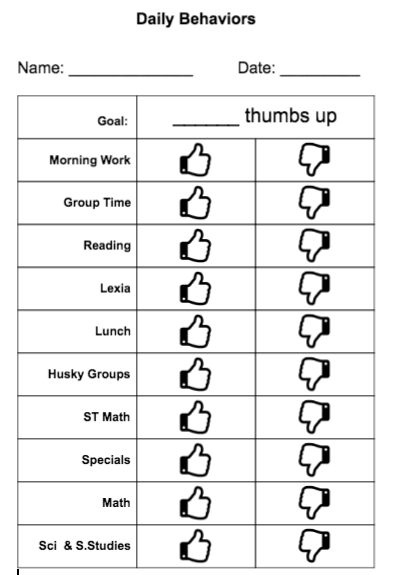
My students have been earning one mystery box for each thumbs up earned. They don’t get the reward in the box if they don’t earn their thumbs up on their chart. It is extremely important that they get their reward as soon as they earn it! It also needs to stay a mystery. I tell my students that if they peek, they don’t get the reward. I cover the top of the box with their pictures (or words for older students) of their task or schedule.
I have used it with a clip chart. I set a goal with my class that if all of my students (the goal depends on the type of class you have) could get to a certain color on the clip chart they could earn a mystery motivator. In using plastic eggs, I used the same concept as the fill the jar concept except we filled a basket. Once the basket was filled, the class could earn their mystery reward (which I placed in the golden egg). The golden egg couldn’t be opened until the basket was full. This reward usually took my class about a month to earn after we had it up and running. I started with a short-term goal to start with (1 week).
When our basket was full, we had a class Easter egg hunt. With the teacher in me, this of course was not a FREE hunt (but the students didn’t know it until the day of the hunt). I wrote math facts (we were learning multiplication facts) on the outside of each egg. To differentiate for my students’ needs I wrote some easier facts (like the 0 and 1 facts) along with some double-digit facts (34×20) to challenge the students who had already mastered their facts. They were instructed to ONLY pick up the egg if they knew they could answer the problem (or they wouldn’t get what was inside).
I have also used sight words. I had enough eggs for each one of my 27 students to pick up 7 eggs. I gave them each an egg carton, blew my whistle and off they went until we couldn’t find any more eggs. Just make sure to count the eggs before you hide them:) I hid a few extra just in case some weren’t found. Eggs were found by random recess students for days after out hunt (which caused a few problems with other teachers), oops.
Mystery Motivator With A Tally System Or Mystery Word:
I am currently using the mystery motivators in conjunction with the mystery word system in a 2nd-grade classroom. Use the same concept above but students earn a mystery motivator for each tally they get as a class or the number of letters revealed in the mystery word. You could also use this with a red, yellow, green flip a card system (I really don’t recommend this approach -as it does not focus on POSITIVE behavior), this is just my own personal opinion! But, you could have your students who have green cards at the end of the day earn an egg (or whatever other creative mystery you use) for your class basket. I have also used mystery motivators with my classroom economy system. Students could buy Easter eggs with their “classroom cash” to fill our basket.
With all of the systems I have mentioned above, I would also randomly place a “free” egg in the basket, just because and tell my students how AMAZING they were:)
Mystery Motivators With Individual Students (Tier 2):
Tier 2 Targeted Intervention And Supports (MTSS, RTI):
Tier 2 doesn’t replace tier 1 supports, rather, it’s in addition to. In order to determine whether a student qualifies for tier 2 supports you will need to look at a few things such as office referrals, screenings, teacher nominations and formative assessments. Students are compared to their peers. Mystery motivators are a GREAT tool to use with students who need super short term motivation!
1. Tier 1 Core Classroom Instruction: You need to first make sure that your tier 1 (whole class management system) is strong before even considering conducting a tier 2 intervention! This is a VITAL step! Take a close look at your class rules, procedures and expectations. Contrary to what some teachers think, procedures need to be taught, re-taught and practiced consistently. They need to be clearly stated, displayed and referred back to often (like every time you use a procedure).
I have been in sssssoooooo many classrooms where rules and procedures were taught in the first week of school, but NEVER re-taught, followed through with consistently or referred back to! Sometimes this is all we need to do in order to get the mischief under control. I always tell the teachers to start with going back to the basics. The point of teaching procedures is to get the students automatic at following them. If you have to, overdo it at first. I mean really, this will eventually annoy your students sssssooooo much that they will start holding themselves and each other accountable for following your procedures. It will also communicate to them that you are serious about the expectation that all students follow the classroom procedure.
2. Conduct the ABC’s Of Problem Identification: Using data to identify and define problem behaviors (This is where an instructional coach or guidance counselor can help identify the ABC’s of behavior identification). Problem Analysis: Using data to hypothesize why the problem behavior identified is occurring. Intervention Design: Developing and implementing evidence-based behavioral supports and interventions that match the hypothesis. Universal strategies, replacement behavior. Response to Instruction/Intervention: Using data to determine the effectiveness of the supports to decide next steps. A crucial part of determining the reason for an undesirable behavior is observing the context in which the behavior occurs, including all antecedents and consequences. Use the ABC’s of behavior identification: A- Antecedents: What is happening right before the behavior occurs? B- Behavior: What the student does, says or doesn’t do. C-Consequence: What happens after the behavior occurs?
3. Select Motivators: It’s important that you gather a list of motivators that the student would like to work towards earning. There are TONS of ready-made lists out there, but they had items that weren’t realistic/possible for my teacher to use, so, we created our own list of possible motivators. I always make sure to also ask the student if there is anything missing from the list that they would like to earn. Remember, this is the MOTIVATION part, so it is extremely IMPORTANT to have the student choose what they want to earn.
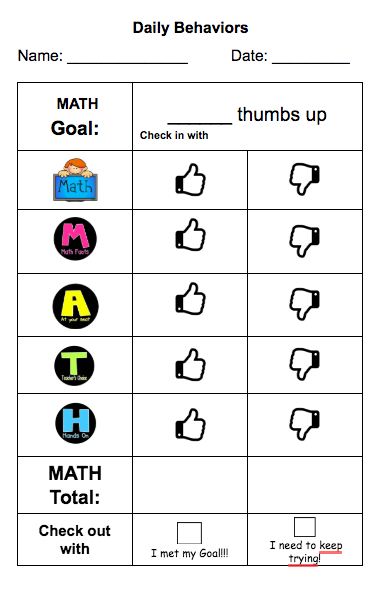
4. Develop A Plan & Goal: Identify positive behaviors, develop specific goals including a timeline (how often they will be earning the motivator) and figure out what tools you will be using (eggs, sticks, envelopes, pill case..) I would recommend using a mystery motivator along with a self-monitoring tool. The student needs to monitor their own behavior in order to increase their self-regulation.
This is the self-monitoring chart I am using with a 2nd-grade student. He earns one mystery motivator (Easter egg) for each thumbs up. He gets to pick one egg out of his egg carton immediately after each section. His eggs contain a motivation slip, small treat (like crackers, stickers, candy) and a growth mindset “fortune”. We also use this self-monitoring chart to set goals during his check-in/check- out. If he meets his goal for the day (we started at 6 out of the 12 eggs) he gets to pick a McDonald’s coupon.
We literally started out with a baseline of 0 out of 12. We are working our way up to 12/12 of course. I actually ended up breaking up his morning and his afternoon. He could earn 6 mystery motivators in the morning and 6 in the afternoon with a goal of 3 eggs in the morning and 3 in the afternoon. He came up with all of the motivators, he just doesn’t get them unless he earns the thumbs up. Click here for your free copy.
5. Communicate With The Student: Sit down privately with your student and communicate the new plan. Make sure that you communicate this as a POSITIVE thing!! Many students with mischievous behavior are VERY smart and can usually figure out that they are the only one in class on this plan. Some students don’t want to be singled out with an individualized plan. This is where we started the mystery motivator with the whole class as well (see above).
6. BE CONSISTENT: Follow through with the plan with fidelity. Use formative assessments (daily charts) to gauge whether it is working. Make sure that you praise the student regularly! Remember, POSITIVE reinforcement breeds positive behavior!
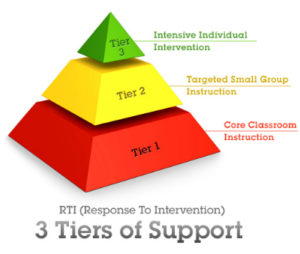
Are you struggling with an unruly class? Do you have a well-behaved class with the exception of a few students? Have you tried every classroom behavior strategy under the sun in hopes that your class runs like a well-oiled machine, but still need help with a select few? Everyone knows that teachers don’t get to choose their students. Even the most seasoned teachers who have years of experience with classroom management, run into those students who don’t respond to their classroom management system. In my research, I have found multiple researched-based classroom behavior strategies that I would like to share. This post is based on following the MTSS or RTI system of tiered supports guidelines.
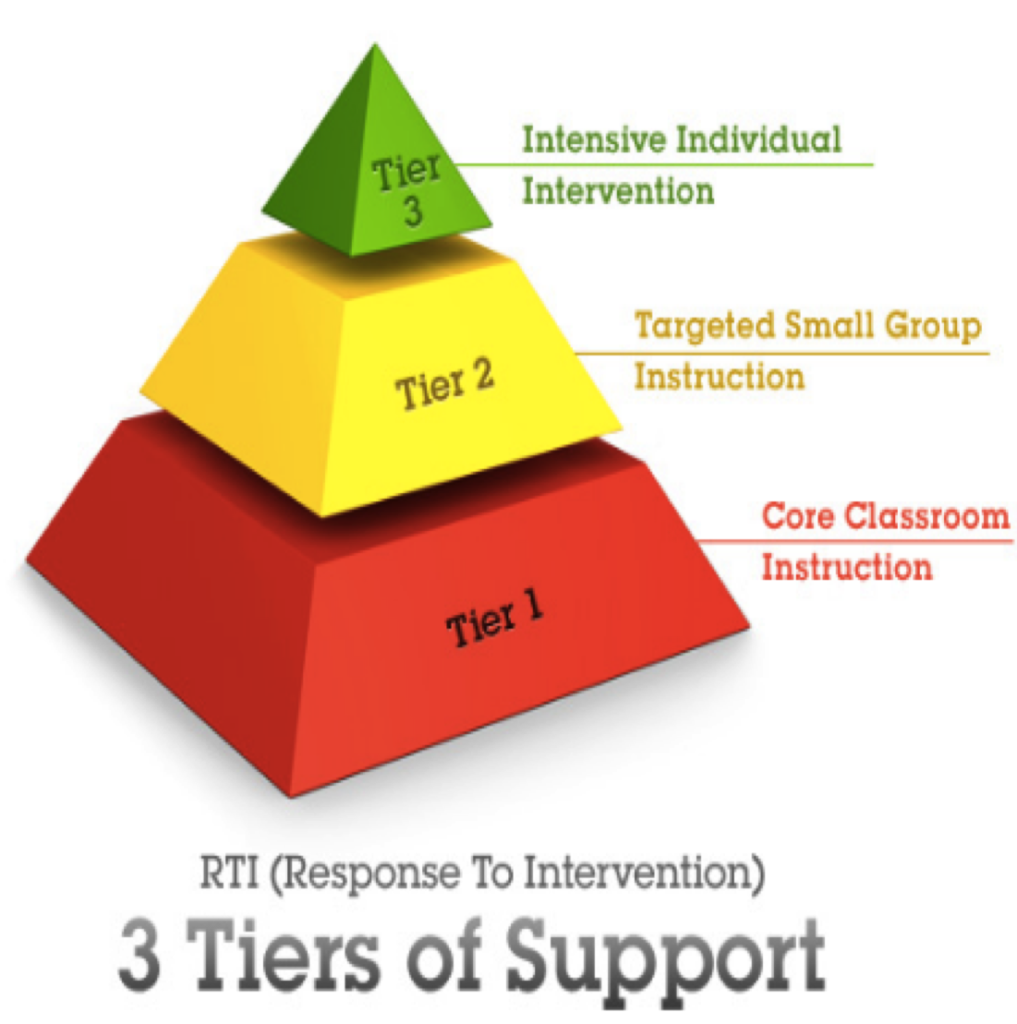
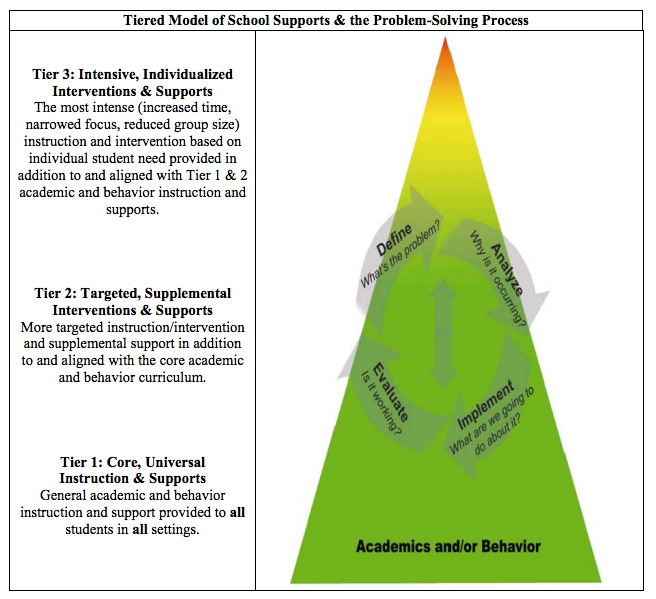
What does a three-tiered model for instruction involve?
A three-tiered model for instruction and intervention is based on the principle that academic and behavioral supports are first provided at a core or universal level to effectively address the needs of all students in a school (referred to as Tier 1). However, not all students will respond to the same curricula and teaching strategies. As a result, some students with identified needs receive supplemental or targeted instruction and intervention at Tier 2. Finally, at Tier 3, a few students with the most severe needs receive intensive and individualized behavioral and/or academic support.
Classroom Management:
The term classroom management is confusing and misleading, mainly because it has no clear and widely agreed-upon definition. For some, the term refers to general control of students; for others, it refers to discipline procedures; for others still, it refers to both routines and procedures. Classroom management is about building relationships with students and teaching social skills along with academic skills.
There are two aspects of an effective learning environment (and, by extension, successful classroom management):
relationships (specifically, the range of interpersonal skills necessary to maintain healthy relationships)
high-quality instruction (characteristics of effective instruction)
When students have strong, trusting relationships both with the adults in the school and with their peers, and when their lessons are interesting and relevant, it’s harder for them to misbehave. We don’t expect an effective classroom management system to eliminate all problematic behavior any more than we expect a new set of standards to raise all students’ scores by leaps and bounds on the first try. Students are going to misbehave as they learn and grow—it’s how we respond to their misbehavior that matters. We believe that students should have a chance to learn from their mistakes and to restore any damaged relationships with others. Check out Growth Mindset Pinterest board that I currently follow for more ideas.
All students have individual needs. Some students’ needs are easy to recognize. They may have visible disabilities where they require the use of a wheelchair or may need to wear glasses, braces on their limbs…. Other students may have invisible disabilities such as ADHD, learning disabilities, emotional issues, anxiety, oppositional defiant disorder or….. they may come from homes where violence, drugs, lack of food are an everyday occurrence or a mixture of all of the above.
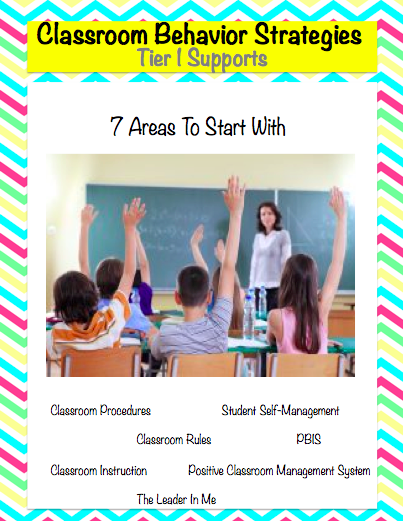
7 Areas To Start With:
What procedures do you have in place? Did you directly teach them? Do you practice procedures regularly?
Do you have a set of classroom rules? Did the students help create them?
Do you have a visual positive classroom behavior management system that anyone could run (including a substitute)?
Are students involved in self-management? Do they keep track of their own behavior?
Is your classroom behavior management system positive or punitive? What is your classroom culture like?
What does instruction look like? Are students sitting for long periods of time? Is it engaging?
What is your district’s expectations, mission, vision? Are you a PBIS (Positive Behavior Intervention and Support) school?
(1) Classroom Procedures:
The secret to warding off at least some behavior problems is establishing positive classroom procedures for daily tasks and activities. Your students will appreciate your consistency, and once they have internalized classroom procedures, the day will run that much more smoothly. Classroom procedures should be taught at the beginning of the school year and consistently practiced throughout the remainder of the year. One HUGE mistake a lot of teachers make is to teach them the first week of school, but never refer back to them, or expect the students to follow them without directly practicing them together.
Never Assume!
Another mistake teachers make is assume that older students “should already know” certain expectations. NEVER assume they already know any procedure. Procedures change from teacher to teacher, classroom to classroom, grade level to grade level and building to building. I am currently in a coaching cycle with one of our elementary guidance couselors. She is helping a new 1st-grade teacher who was just hired in January (I know, not an ideal time to start with a new classroom, but was best for kids) with getting her classroom procedures set up. Although these students have been in 1st grade since August, they are now in a new classroom, with a new teacher (literally) and a new group of classmates. We are using Interactive Modeling from the Responsive Classroom training that she attended. Interactive Modeling is a great way to teach and practice classroom procedures, even with older students.
Directly Teach Procedures
Below is a list of general procedures that you should consider directly teaching at the beginning of the school year (and practice them throughout the year).
Entering and exiting the classroom
Lining up (ABC order? Youngest to oldest? Tallest to shortest? Will this change from day to day?)
Walking in the hallway (I like to use hips and lips with younger students)
Getting the teacher’s attention (signals)
Getting out, putting away supplies
Participating in group lessons, working with a partner, working independently…
Obtaining help with assignments
What to do with finished work/ what to do when you are finished
When and how to use the drinking fountain, water bottles, bathrooms
Classroom jobs/rules/expectations
Using the classroom library
Inside recess equipment and expectations
Pledge, fire drill, tornado drill
Signals for obtaining attention
Communicate Procedures:
I always started my year off (at open house with the parents) and the first week with the students directly teaching all of my procedures. I created a procedural handbook that each student kept in their desk. We would also refer back to it if we forgot a certain procedure. I also incorporated tons of get to know you activities and team building activities. Yes, your students may already know each other, but chances are, there are students in your classroom that have never been in the same classroom together (unless you only have 1 or 2 sections). Even so, there probably hasn’t been the same exact mix of students in any given grade previous to yours. This is a great classroom behavior strategy to start with. It sounds simple, but is a necessary process in improving classroom behaviors.
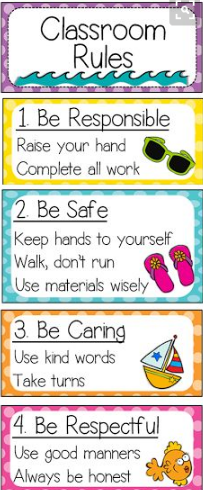
This one seems like a no brainer, but trust me, it is skipped way to often. Classroom rules play a vital role in effective classroom management. They are great classroom behavior strategies used to start your year out right. However, rules alone exert little influence over student behavior. Too often, rules are posted at the beginning of the year, briefly reviewed once, and then attended to minimally. When this is the case, they have little to no effect on student behavior. There are several rules for rule setting that, when followed, help create orderly, productive classrooms that teach appropriate social skills along with the academic curriculum. To be more effective, our classrooms should have four-to-six rules that could govern most classroom situations. Too many rules can make it difficult for students to comply and for teachers to enforce.
Create Rules With Students
When students play an active role, they begin to learn the rules, and they are more inclined to have rule ownership. The rules become their rules, not our rules. To include students, conduct several short rule-setting meetings the first few days of school. For these meetings to be effective, we need to share with our students the rule-making guidelines (e.g., the rules need to be stated positively, they have to be observable and measurable, consequences need to be realistic).
With guidelines in place, students often select rules similar to the ones we would have selected. Without guidelines, students are inclined to make too many rules, make rules that are too stringent, and make those that are not specific enough. Classroom rules should be simple, specific, clear, and measurable. The degree of rule simplicity depends on the age and ability levels of our students. For younger students, we may want to include pictures in the rule posters.
Keep Rules Specific & Positive
Rules are specific when they are clear and unambiguous. For example, the rule “bring books, paper, and pencils to class” is much clearer than the rule “be ready to learn.” Clearly stated rules are easily observed and measured. The classroom rules should be posted and referred to regularly. Students should be “caught” (recognized positively) for following the rules. We consistently need to carry out the consequences and noncompliance of our classroom rules or they will mean very little. If our students follow the rules for group work at the learning center, we should verbally praise them and provide additional reinforcement as needed (e.g., stickers, extra free time). Below is an example of positive classroom rules. These are pre-made. I would suggest having your students help you come up with your own set of positive rules that are personalized to your classroom.
Be Consistent!
Students are often given mixed signals as to what is expected and what will happen if they do not meet these expectations. Inconsistent expectations cause student confusion and frustration. Inconsistent consequences maintain misbehaviors and can even cause the behavior to occur more frequently or intensely. In addition, we find ourselves constantly reminding and threatening which, in turn, enhances our frustration.
Expectations are clear when they are identifiable and consistent. Reviewing expectations and rehearsing rules help build routines and minimize the potential for problems. We can do this by asking our students to read the expectations prior to each activity. When we have temporary expectation changes (e.g., changes in rules due to a guest being present or special school event), we must inform our students.
Whole Brain Teaching:
For rule compliance, positive consequences should be applied continuously at first (every time the student is appropriate) and then intermittently (every so often). For example, if “following teacher’s directions” is the classroom rule, then we should provide some form of positive consequence, perhaps praising the students for following directions quickly and appropriately. At first, praise should be delivered each time the student follows teacher directions.
Once the teacher establishes the behavior (in this case, following teacher directions), we can move to an intermittent praise schedule. On the other hand, negative consequences (punishment procedures) are most effective when applied continuously. Of course, to effectively deal with this verbal aggression, we also need to implement additional pre-corrective methods, such as teaching appropriate expressions of anger, peer mediation, prompting and providing praise for socially, appropriate interactions. Check out Whole Brain Teaching For Challenging Kids. Check out my whole brain teaching Pinterest board for more ideas.
Another characteristic of effective rules is that they are stated positively. Positively stated rules are “do” rules. Do rules provide information as to how to behave and set the occasion for teacher praise. An example is “Raise your hand for permission to talk.” Conversely, negatively stated rules or “don’t” rules tell students what not to do and encourage us to attend to student rule breaking. An example of a don’t rule is “Don’t call out.” Don’t rules have been proven to be ineffective.
(3) Positive Classroom Management System:
Frequently, the question is asked, “Why should I have to teach kids to be good? They already know what they are supposed to do. Every student needs to learn how to comply. Why can I not just expect good behavior?” In the infamous words of a TV personality, “How is that working out for you?”
Why do we punish students by meting out “consequences” when they misbehave? Probably because we experienced punishment as students ourselves. The most common punishment for student misbehavior in elementary school is loss of recess—ironic, given that evidence has shown regular physical activity to reduce problematic behavior and increase student achievement. Another common punishment: placing students’ names on a board and applying checkmarks by those of students who’ve misbehaved. Such attempts to hold students publicly accountable for their behavior can render them compliant but can also make them feel anger, humiliation, and a range of other negative emotions that serve to shut down learning.
Don’t Single Kids Out!
Taking things away from students in the name of improving their behavior and learning can actually do the exact opposite. Can you imagine if we did the same in an attempt to improve faculty behavior? Teachers are infamously known to make the worst students. What if you had to stay 10 minutes after work because you talked during a staff meeting? What if your name were singled out on a chart for turning your grades in late? Consider the range of emotions these actions would evoke in you—and realize that children feel these emotions, too.
Just as students need teachers to teach them grammar and math, they need us to teach them how to respond properly to events. They need us to teach them socially appropriate behavior throughout the grade levels. Students need direct social skills instruction.
Children who are habitually criticized, humiliated, or shamed internalize negative feelings about themselves that hinder their healthy development. By contrast, children accustomed to loving support and guidance are much more likely to become healthy and productive citizens.
I lOVE to use books by Julia Cook. I have also used this AMAZING anger management book to help give students strategies when they get angry.
Greet all of your students as they enter your classroom.
I have recently found an amazing video where a teacher has a “secret handshake” with each student. What a great way to make each and every child feel special and build trust! Seriously….. this guy is a rockstar!!!
Morning Meetings are a great place to start. Start your day off on a positive note. Gather your students on the carpet, and get to know them. This is a great time to directly teach social skills and leadership qualities throughout the school year.
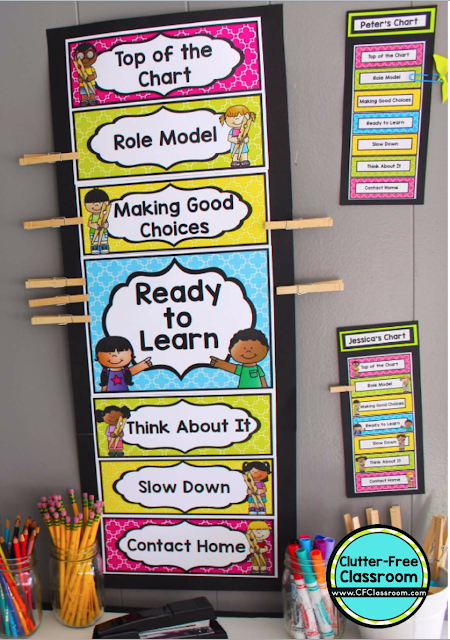
Clip charts: The clip chart is a great classroom behavior strategy that consists of a chart that has been divided into levels. All of the children start the day on Ready to Learn. Then, during the course of the day, the children move their clothespins up or down the chart, based on the behavioral choices they make. If they are making good choices, they can move their clothespin up a level at a time. Inappropriate behavior would cause them to move down a level. Since the children start in the middle of the chart, they have numerous opportunities to work their way up the chart. This really helps the children realize that they have to have self-control and be responsible for their actions and behavior if they want to be recognized for making good choices.
Making it to the top of the chart is not easy, but it is definitely attainable. My students even had the chance to clip off the charts with good behavior. They would have 3 extra off the chart with positive behavior opportunities. I started at the bottom of my skirt (or pants). I would literally clip their clips to the bottom of my clothing. They could work their way up.
The next level would be clipped to the bottom of my shirt with the final level clipping into my hair. I know it sounds corny and a bit goofy, but it was really motivating for my students to see their clothespin in my hair:) At the end of each day, the children document what color they go home on so their parents are aware. I used a baseball theme recording sheet to follow my classroom sports theme. It worked great for most of my 3rd graders (all but 1 student). The one student that it didn’t work for I had to come up with additional behavior strategies/interventions for him (Tier 2). See my next post for ideas of more intensive strategies/interventions that I used with him.
Classroom Economy
My Classroom Economy is another great classroom behavior strategy program that enables any educator to teach children financial responsibility through fun, experiential learning. I based mine after Beth Newingham’s classroom economy system. I am currently in a coaching cycle with an 8th-grade math class implementing a classroom economy fit for middle school students. I used this site to get started. There are multiple videos by Thom Gibson that I also used to help get the 8th-grade classroom economy system started. Check these out if you are interested in using this system, they were a lifesaver! Check out my post on how I run my classroom economy here.
(4) Student Self-Management:
Managing classroom behavior may be more challenging today than ever before but is a classroom behavior strategy that is routinely overlooked. Many teachers face larger class sizes, more students who come from stressful, chaotic homes, and increased diversity in students’ abilities and cultures. Yet, many of us are determined to manage classroom behavior ourselves. After all, collaborating with others takes time and energy to build rapport and come to a consensus on behavior-change priorities and strategies. It’s tempting just to forge ahead. Although, going at it alone may seem like a good idea in the short-run, in the long-run, we are more likely to burn out and lose our effectiveness.
Let Others Help!
Fortunately, there are many others who can assist in our behavior management efforts, including students, their peers, fellow teachers, instructional coaches, behavior interventionists, guidance counselors, administrators, parents, and other school personnel, which can be invaluable resources. We should seek out their assistance when needed for support, guidance, and additional strategies.
Use Self-Monitoring
One effective way to include students in their own behavior change programs is the use of self-monitoring. With self-monitoring, a student helps regulate his or her own behavior by recording its occurrence on a self-monitoring form. To help ensure accuracy of self-monitoring, we should occasionally collect the data ourselves and compare our recordings with those of our student. If our student accurately self-monitored, we should reinforce his or her accuracy. In addition, we should hold brief, occasional student-teacher conferences to review the student’s progress.
There is a direct link between our lessons and student misbehavior. Perhaps our lesson is too easy or difficult, ineffective, or nonstimulating, which can lead to student misbehavior. The first line of defense in managing student behavior is effective instruction. We are teaching 21st-century learners. As teachers, we need to become 21st-century teachers.
Differentiate
As our students needs change, so should our approach in teaching them. We need to move away from the “one size fits all approach” (that most of us grew up with) where every student is involved in “sit and get” lessons. Good teachers have always known this and research supports this notion. When teachers differentiate learning, achievement and behavior improve dramatically. Planning for and responding to variances among learners creates the best learning experience possible. It includes processes to determine the effectiveness of instruction, the use of data to guide instructional decision-making, and it ensures access to success for all students.
Check out my coaching cycle video for best practices:
Use Data To Drive Instruction
Data should “drive” instruction. In order to truly differentiate to improve motivation and time on task student engagement, pre-assessments are a necessity. Standards should be identified, unpacked and repacked. Data from the pre-assessment should be used to differentiate instruction. Pre-assessments are not just for comparing growth to the post-assessment anymore. If a student scores 100% on the pre-assessment should they be required to sit through the lesson? This is an area where I have found most teachers struggle with. Yes, it’s easier for the teacher to make them sit through the lesson, but is it what is best for students?
Change Your Mindset
Would you be ok with your child sitting through lessons they already know about? Is this really the best use of their time? As teachers, we need to change our mindset to what is best for the students, not what is easiest for the teacher. What about those students who score 0%? The students who have no background knowledge and are missing pre-requisite skills? Students who could benefit from pre-teaching of the skill. This is typically where a lot of misbehavior occurs. Students who already know the skill or truly have no clue are usually the ones who tend misbehave the most.
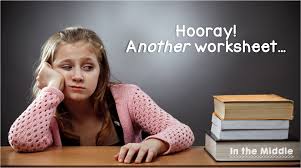
Said no student EVER!!!!!
Limit Worksheets!!!
Just because the worksheet comes with the basal doesn’t mean they have to be used. I have been in so many classrooms where worksheets are the main method of student practice. Teachers are overwhelmed with the amount of correcting they have to do and students are bored out of their minds! Think about it. Would you like to sit for hours filling out worksheets? Would you want your child doing this? It’s time to bring the “art of teaching” back, aka, bring the FUN back! I have spoken to so many teachers who feel like they are creating little robots. This is due to the pressures teachers face on a daily basis. The amount of testing, behavior problems, lack of time and large class sizes all play a part in our teaching techniques. Most teachers go into teaching with passion, creativity and the promise of making a difference in children’s lives. Somewhere along the way, some teachers lose that spark and forget about the art of teaching. Let’s face it, the pressures will always be there. But, they don’t need to stop you from your passion.
Bring The Fun Back Ideas: (to use with any age student)
Instead of round-robin reading, have your students act the story out.
Create a giant Scrabble type game for students to practice their spelling/vocabulary words.
In writing stories, paragraphs, questions, solving story problems, let the students have a snowball fight. Instruct students to write their first sentence, essential question, introduction to their story on white paper. Tell them to crumple their papers into a ball. These will be their snowballs. Students will throw the snowballs at each other (give them set rules before you start: no head or eye shots) for a selected time frame. After the timer goes off, the students will open up the snowball that they pick up and complete the problem, write a few lines of the story or paragraph or ask a question about the essential question.
Practice math facts with an Easter Egg hunt (you can do this really with any math facts/problems). Place the numbers to be practiced on both sides of the plastic egg. I always placed a small little treat (a skittle, M&M, sticker…) inside each egg that the students could only earn with the correct answer. Differentiate by placing larger and smaller numbers on each egg. Have some students add (if that’s the targeted skill) while others multiply. I always hid a few golden eggs that when found could be turned in for a surprise (extra recess or individual item like a stuffed animal or a pack of gum…) Give each student an egg carton and a # of eggs to collect. Hide the eggs around the school. This does not need to wait until spring. I have used this in the winter, fall, and spring. This also makes a great center. Place all eggs in a basket with the answers on a piece of paper inside each egg for a self-checking device. Write answers in the bottom of the egg carton for each egg. Have the students match the eggs to the correct space in the carton.
(6)PBIS:
In the past, schoolwide discipline has focused mainly on reacting to specific student misbehavior by implementing punishment-based strategies including reprimands, loss of privileges, office referrals, suspensions, and expulsions. Research has shown that the implementation of punishment, especially when it is used inconsistently and in the absence of other positive strategies, is ineffective. Introducing, modeling, and reinforcing positive social behavior is an important step of a student’s educational experience. Teaching behavioral expectations and rewarding students for following them is a much more positive approach than waiting for misbehavior to occur before responding. The purpose of schoolwide PBIS is to establish a climate in which appropriate behavior is the norm. The schoolwide PBIS process emphasizes the creation of systems that support the adoption and durable implementation of evidence-based practices and procedures, and fit within on-going school reform efforts. An interactive approach that includes opportunities to correct and improve four key elements is used in schoolwide PBIS focusing on: 1) Outcomes, 2) Data, 3) Practices, and 4) Systems.
Tier 1 supports (universal)
Tier 2 supports (targeted group)
Tier 3 supports (individual)
Systems of support improve lifestyle results (personal, health, social, family, work, recreation) for all children and youth by making targeted behaviors less effective, efficient, and relevant, and desired behavior more functional.
Every Student Is A Leader:
One amazing program and book that I am currently looking into is called The Leader In Me Program. The Leader in Me is Franklin Covey’s whole school transformation process. It teaches 21st-century leadership and life skills to students and creates a culture of student empowerment based on the idea that every child can be a leader. I work primarily with elementary aged students, so I have been looking into The 7 Habits Of Happy Kids. This system fits amazingly with our schools PBIS framework. There is a leadership curriculum for every age of students. The 7 Habits of Highly Effective Teens (great for middle school aged kids). And The 7 Habits Of Highly Effective People, which is geared towards high school-aged students. Instead of seeing children through the lens of a normal distribution curve—some kids are naturally smart and others are not—The Leader in Me paradigm sees that every child is capable, every child is a leader. This paradigm changes everything. Check out my 7 Habits Pinterest Board for more ideas.
For more strategies and details on how to deal with the students who don’t respond to ideas in this post, stay tuned for more specific strategies and interventions.
As an Instructional Coach, my job is to work through coaching cycles with those teachers who would like to improve or enhance their curriculum or teaching practices. Currently, I am involved in an informative writing coaching cycle with a 5th-grade teacher.
Informative Writing/ Genius Hour Research Notebook & Posters
What Is A Coaching Cycle?
Coaching cycles take place between an instructional coach and a teacher. In my school district, a teacher has the option to work with any of our 3 coaches. They are NEVER forced in a coaching cycle. Coaching cycles can be conducted on an individual basis or as a group. Coaching cycles are individualized and may look different from classroom to classroom, however, in our district, we follow the same process regardless of the size of the coaching group or topic that we are working on. We follow the PLC framework and work on answering the 4 questions of the PLC.
Who are our learners and what do we want them to learn? (identify standards and select a student-centred goal that connects to the district Vision, Mission, goal, building goal and state standards) DATA NEEDS TO DRIVE INSTRUCTION!!!!!
How will we know if the students master the essential learning? (Plan formative and summative assessments)
What will we do if they don’t learn it or already know it? (Plan for differentiation)
Reflect and share. (Examine pre and post-assessments, reflect on the coaching cycle)
Coaching Cycle Intro Video: (created by me: Kristi Druvenga)
Informative Writing & Genius Hour:
The past few years I have worked with 4th and 5th-grade students on genius hour. The concept behind genius hour is that everyone is a genius in something or they become a genius of a topic of their choice. Students are given a choice in their learning by choosing their own topic to study. Their ideas drive their research. Students choose their own topic and go through the process of conducting research (informative writing process). I quickly realized that genius hour and informative writing go together like mashed potatoes and gravy (my personal favorite:). You can’t have one without the other. At first, I struggled to organize how I would teach genius hour, so I created a plan.
Step 1: Who are your students and what do you want them to know?
Identify Standards:
The first step in any coaching cycle is to identify your standards. What do you want your students to know? What are your district and building goals? In the coaching cycle process, this is where we would unpack and repack the grade-level state standards and create “I can” statements for our priority standards. This is also the 1st essential question in the PLC process that our school uses. Check out the book by Richard Dufour and Robert Eaker called Professional Learning Communities At Work: Best Practices for Enhancing Student Achievement to learn more about PLC’s and how they run.
Step 2: How will we know if each student has mastered the essential learning?
Plan Assessments:
The second step in a coaching cycle is to plan your assessments. What are your pre-assessment and post-assessments going to look like, measure? How will you use your pre-assessment data? How will your data drive instruction? Are your pre and post-assessments similar enough to compare apples to apples? Are they quality assessments? How do you know?
You can find assessments on the internet, or, create your own. I like to use a mix of the two. Be careful with assessments that you don’t create yourself. I use graphic organizers that I find online that fit with what I am teaching as some of my formative assessments. It’s important to make sure that ALL of your assessments, even formative assessments, are aligned to the standards you are working on. I also use the informative writing research notebook as a formative assessment. I choose to create my own summative assessments and rubrics (found in my informative writing pack). I also just started using (and creating) my own student proficiency scales. I believe that it is important for students to understand their learning process and the difference between low-level skills and higher-order thinking skills.
Step 3: What will we do if they don’t learn it and what if they already know it?
Differentiate:
The third step in the coaching cycle is to make a plan for differentiation. Are students exposed to innovative and effective teaching strategies and characteristics of effective instruction? How will we deepen the learning for students who have already mastered the essential skills?
In trying to figure out a plan on how to differentiate I first needed to figure out how we would teach informative writing. I was working 5th-grade grade teacher who had taught 1st grade for the past 10 years. I myself had previously taught 3rd graders. I did have experience with teaching genius hour to 5th graders, but I knew I needed to improve my process. So….. I started researching.
I stumbled upon this AMAZING blog called Upper Elementary Snapshots where I found some pretty amazing lessons to start with that were created by the talented Rebecca Rojas from Create Teach Share. I used the 4 mini lessons for getting started with informative writing. I really wish I would have found this sooner. Seriously…….if you haven’t found their blogs yet you NEED to follow them. I ended up purchasing the Informative Writing For Upper Elementary bundle. Trust me, if you are fairly new to informative writing, it’s a lifesaver.
I realized that my students struggled most with the organization piece when it came to putting all of the teachings together. In order to plan for differentiation, I ended up creating a research notebook along with posters on how to narrow a topic and how to create an essential question that connects with the world. I used this right along with the informative writing lessons. My students struggled the most with narrowing their topics and creating their essential questions. They needed a visual and I needed a better way to explain the process. I also started conducting individual conferencing with those students who needed extra support in both of these processes. The writer’s workshop framework is something that the teacher I am working with and I am using for our differentiation process throughout the informative writing unit.
Step 4: Reflect and Share
Presentation:
How will your students share their newly found knowledge? What will they create? Once you have a plan in place it’s time to organize the implementation. I prefer to put all of my lessons into a proficiency scale. Check out the backwards lesson design similar to the Understand By Design (UBD) framework and Marzano’s Competency-Based Education. I am also a HUGE fan of Marzano’s proficiency scale bank.
Breakout of your box with Breakout EDU! Do you feel that you need to break out of your box? Do you have an unruly or just busy class? Do your students need to work on team building and social skills? Well, break out of your box with Breakout EDU! Breakout EDU creates ultra-engaging learning games for people of all ages. Games (Breakouts) teach teamwork, problem-solving, critical thinking, and troubleshooting by presenting participants with challenges that ignite their natural drive to problem-solve.
To “break out” of the box students need to work together to solve a series of puzzles in order to open each lock. Breakout EDU brings the Escape Room to the classroom. Escape rooms have been popping up all over the country. Escape rooms are where people are willingly locked into a room. Groups are given a predetermined set of time to break out using a series of hidden clues. Sometimes groups run into red herrings. The main concept of Breakout EDUs and Escape rooms is that groups need to work together to break out. Rather than breaking out of a room, students are asked to break out of a box.
Social Skills & Employability Skills:
These are GREAT to use with Employability Skills and to build social skills for students of all ages. There are games appropriate for students K-12 and beyond. I have used Breakout EDU with Kindergarteners, 9th graders and adults. The Gingerbread Man Is Loose In Our School that goes along with the book with the same title was great before the holidays with Kindergarteners. The Kindergartener’s job was to work together to break the gingerbread man out of the box.
Before Christmas break, I used Reindeer Games with a 5th-grade class that needed to work on social skills. Their goal was to work together to break the reindeer out of the box by solving reindeer games. I have also used Unlocking Shakespeare with a 9th grade English class as a way to assess Employability Skills to end the Shakespeare unit. There are literally hundreds of breakout both with the tangible box and locks and online breakouts. To get started with your Breakout use this link. Breakout EDU boxes are $89 and come with all locks you will need. They will also come with a password to access all breakout games.
Breakout EDU’s are great tools that can be used to introduce new lessons or reinforce a new skill. It is also great to use at the end of a unit to bring closure or to reinforce skills.
Skills Used With Breakout EDU:
All Breakout EDU games teach critical thinking, teamwork, complex problem solving, and can be used in all content areas. The breakout box immediately sparks curiosity and forces students and teachers alike to think outside of the box. Talk about motivation!!!! Breakouts are great to use to teach and assess communication skills along with speaking and listening standards (especially with little ones). As mentioned above, they also work great in teaching and assessing Employability skills. Breakout EDU’s provide opportunities for students to grow as leaders. Often it is the least likely student in the class that will show their natural leadership skills. An interracial part of conducting Breakouts in your classroom is the debriefing process. Students need the opportunity to reflect on the process and evaluate their own thinking. They need the chance to break out of their own box to expand their learning.
Resources
Check out the Breakout EDU website for tons of free game ideas and directions. Unfortunately, in order to access most of these activities, you will need to purchase a site membership.
I also love to use the EzPz Science Escape Room activities from Teachers Pay Teachers. They are super simple to use and literally a print and go resource not to mention very fairly priced. I would suggest purchasing the box and lock materials off of Amazon and using the free materials from the breakout site or you can find tons of ideas on TPT.
There are 3 models of Instructional Coaching. The purpose of an Instructional Coaching Model is to help close the student achievement gap and accelerate learning for all students by building teacher capacity through implementation of effective instructional practices (Casey, 2008). The primary responsibility of instructional coaches is to improve classroom instruction and increase student achievement.
In my research I have found three coaching models that are being used in school districts. I have also been trained in all three. My favorite model, and the model our school chooses to use is Student Centered Coaching by Diane Sweeney. I would highly recommend this model. It really takes the pressure off of both the teacher and the coach. The main focus is on student data, not the teacher, which is non-threatening to teachers. Student data drives instruction, which in return changes or enhances instructional practices. I also like this model best because data and student achievement is the focus. In using this model our focus is on pre assessments, planning formative assessments and using the summative assessment to judge mastery of the standards. This model lends well to differentiation techniques for all students.
However, my team uses concepts from Jim Knight’s training and Cognitive Coaching. The concepts that my team have implemented from the Jim Knight training are the concept that Instructional Coaches are NOT evaluators and the concept of using researched-based strategies. This was a great foundation for our team to start with. Jim Knight also has many great suggestions on how school administrators can help support instructional coaches. Our administration and instructional coaches started with a book study using Jim Knight’s book. A fellow coach and I were also involved in the Elena Aguilar Cognitive Coaching training. We really liked the coaching conversations that this class had to offer. Cognitive coaching is all about the coaching conversations. It’s main focus was on paraphrasing teacher’s reflections and asking the right questions in order to get teachers to get to their own ah-ha moments. My team uses these conversation techniques in our student centered coaching cycles. This technique is great to use during reflections throughout the student centered coaching cycle process.
KANSAS COACHING PROJECT INSTRUCTIONAL COACHING MODEL (Jim Knight)
In the first model of instructional coaching Jim Knight, the Director of the Kansas Coaching Project at the Center for Research on Learning at the University of Kansas has extensively studied instructional coaching methods in schools. Knight commented that the Kansas Coaching Project’s research indicates that efficient coaching models typically take on a three-part cycle: identify, learn, and improve.
The teacher learns about that teaching strategy and then they implement and adjustments are made until the teacher hits the goal….
Over time the kind of goals you set, the questions you ask, the process, is very tight and clear. The process itself is adaptable. There’s a recognition that if this practice or this teaching strategy won’t help, we’ll use a different one. Or change the way we measure progress towards the goal. You work with the teacher and make adjustments as you need to, but the steps are pretty consistent.
Relationship Driven Coaching Cycle:
Establish Equality within the teacher/coach relationship
Teacher maintains both voice and choice
Authentic dialogue and application of pedagogy
Encourage reflection
Built upon reciprocity- both teacher and coach are learners
The coach provides support and resources to teachers
Support is non-threatening and doesn’t challenge teachers
Data is rarely used
Sharing access to textbooks, curriculum is the primary focus of coaching
The coach is viewed as a friendly source of support that provides resources when needed
Inquiry based or cognitive coaching aims to improve a teacher’s instructional practices by focusing on their underlying thought processes and beliefs. Particularly important in this model is developing a teacher’s “cognitive skills of reflection through discourse and application of knowledge.” Cognitive coaching is the model most clearly described by Elena Aguilar of Elena Aguilar Consulting. Coaching that is truly transformational, she argues, must address teachers’ emotional intelligence, non-verbal communication, and underlying beliefs.
Cognitive Coaching Cycle:
Begins with examining student learning
Focuses on what teachers can do differently to improve student learning
The coach moves the teacher towards implementing instructional practices
Focus on researched-based strategies
Summative assessment data is used to hold teachers accountable
Textbooks, technology and curriculum are primary focus
The coach is viewed as a person who holds teachers accountable
STUDENT-CENTERED COACHING: (Diane Sweeney)
The model of instructional coaching supported by Diane Sweeney Consulting (DSC) is known as “student-centered coaching.” According to the organization’s website, student-centered coaching is able to achieve a higher degree of impact on students because of its focus on student learning rather than teacher practice and use of data. Figure 1.3 below displays DSC’s comparison between student-centered coaching and teacher-centered or relationship-driven coaching.
Coach and teacher are partners based on student learning
Focus on student data and student work to collaborate
Formative assessments are used to differentiate
Data driven instruction
Summative assessments are used to assess progress towards mastery
Textbooks, curriculum and technology are viewed as tools
Coach supports teachers in moving students towards mastery of standards
Trusting, respectful relationships are a necessary component for all forms of coaching. In order to work toward improving classroom instruction, coaches engage in a variety of in-class activities such as modeling instructional methods, observing teachers at work, out of class activities, co-planning, analyzing student data, developing curricula, and conferencing with teachers. This is a tool that our school uses throughout the student centered coaching cycle (adapted from Diane Sweeney).
 Two of my students read about King Tut. They collectively created an Egyptian pyramid complete with signs of important events throughout his life. They also included non-player characters of important people in King Tut’s life. Students can then either screencast a tour of their world to show to the class, or invite the students to join their “world” and do a self-guided tour with their Minecraft character.